How to Blender: Supercomputer Edition
Welcome everyone. Today I will walk you step by step through how I use Blender in this project.
This post will contain many pictures, as the content is pretty graphic, but they have been slightly modified for simplicity and to keep the focus on the areas I wanted to explain. Most of them can be clicked to enlarge them.
I’m working mainly in Unity, but to generate the 3D models we need a different tool. Blender is the chosen one because of simple reasons: free and open-source. This allowed the IT4I team to develop a custom plugin to satisfy their needs. In the next picture we can observe the basic layout split into two parts: 3D view in the left one, where we will see the 3D model once it’s generated and UV/Image Editor in the right one, where the scans will be displayed as 2D images.

The next step is to select and load a DICOMDIR, which is a file that contains all the data for the DICOM files. Those DICOM files are basically pictures obtained by Computed Tomography from a real patient.
The CT scans are oriented by the anatomical plane, which means that they are done in three axis:
- Sagittal: Y-Z plane. It goes from the left part to the right part of the body.
- Coronal: Y-X plane. It goes from the back part to the front part of the body.
- Axial: X-Z plane. It goes from the lower part to the upper part of the body.
It might be difficult to picture it in our minds, so it’s easier to show it.

From left to right and top to bottom: Sagittal, Coronal, Axial
Once the DICOMDIR is loaded, many more features are available to help extract the information we need from the patient, but they will appear in the order they should be applied.
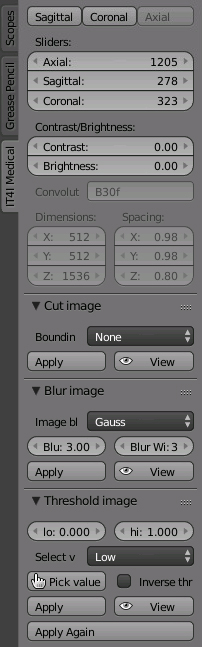 – The first three buttons determine from which axis will the scans be visible in our UV/Image Editor.
– The axis sliders will help the user navigate through the scans. You can input a number directly or use it as a normal slider.
– The contrast and brightness sliders are self-explanatory. Sliding them to the right increases the value of contrast or brightness, and decreases it when sliding it to the left.
– Cutting the image can be useful for removing unnecessary parts from the image. It will decreases the time it takes to process the images, as it will have smaller measures.
– Applying blur to the image will help reduce the noise. Therefore less sketchy areas to be flooded later or smoother K-means labeling.
– Thresholding the image will help to nullify data from a range. To extract the lungs, some tissues with clear differences in the scan can be omitted. As the image is in grey scale, RGB has the same value in all three channels, so only one number is necessary. Checking the lung colours you can see that it never exceeds 0.16, so by setting the high threshold to this number we remove clearly unnecessary tissues, like bones per example.
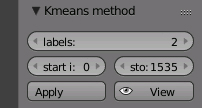 – Applying the K-means method will basically make groups from similar parts of the images and paint every group with a different colour. The more labels, the more number of colours. A range where the K-means will be applied can be defined as well.
It’s hard to explain because I’m not an expert either, but another image will make wonders to help understanding it.

From left to right: 2, 4 and 6 labels
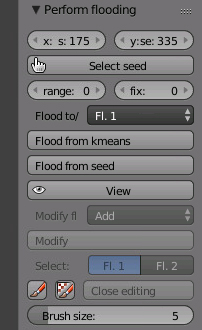
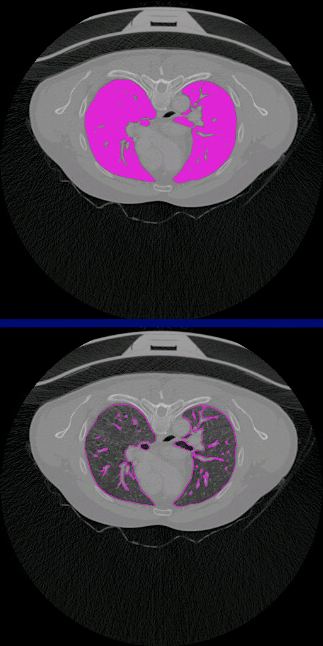
– Once the K-means is done, it’s time to select a seed (one of the colours) by pointing it and pressing Flood from kmeans. You can flood up to two seeds at the same time, and seed something inside a seed. Also, the floods store their inverse, so you could flood the lungs and you will extract everything but the lungs.

In the left side the seed has been flooded. In the right side the boundaries have been created.
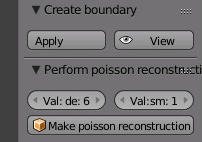 – The next step is to create boundaries, where it will detect where are the edges from the flooded surface and will draw them.
– And the last step is to perform the poisson reconstruction. We can set here the values for depth and smoothness. Higher values will make the processing time longer, but that’s why we are using a supercomputer!
And voilà, a 3D model magically appeared after some delay. Tweaking the values during the process can always make it more accurate, smoother, etc. It’s a matter of playing around with the plugin for a while. This 3D model has been made for this tutorial, it doesn’t represent the outcome of the game.

Example of final result
In the next episode we will try to put everything together in Unity to leave our project ready for the presentation.
Stay tuned for more!
Featured image by Kristoffer Trolle.(CC BY 2.0 without modifications)
I like reading an article that will make men and women think. Also, many thanks for permitting me to comment!